Because so far it is the only broadly adopted open standard. So you might have heard : "It's complicated etc..". Not really if you use the right tools.
Want to see it in action?
Shootn'Share demo
You want to take cool photos and share them with friends using GoogleDrive or Facebook account? With Shoot'nShare you can take pictures, browse your camera roll, pick a photo and share it! Photos get uploaded to your GoogleDrive or Facebook wall. You can also run this demo with its associated Keycloak backend and upload photo to your own social network :]The purpose of this blog is not to show you how to take picture in iOS, so let's work on existing Shoot'nShare. Just clone it from github:
git clone https://github.com/aerogear/aerogear-ios-cookbook
cd aerogear-ios-cookbook
git checkout swift
open Shoot/Shoot.xcodeproj
In this initial project you will find aerogear-ios-oauth2 as a source dependency in Shoot/libs/AeroGearOAuth2 the library we will use for OAuth2 on iOS.
Google setup (optional)
NOTES: This step is optional if your want to try the GoogleDrive app out of the box. You can reuse the Shoot client id for 'GoogleDrive'. However if you want to create your own app, you will have to go through your provider setup instruction. Here's how to do it for Google Drive.
1. Have a Google account
2. Go to Google cloud console, create a new project
3. Go to APIs & auth menu, then select APIs and turn on Drive API
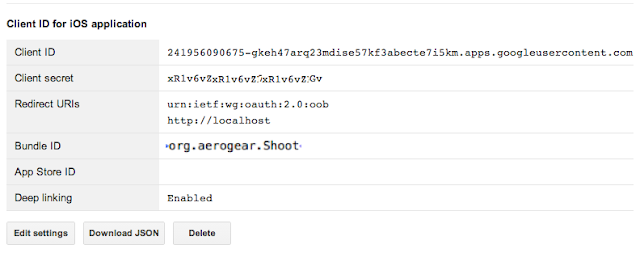
4. Always in APIs & auth menu, select Credentials and hit create new client id button Select iOS client and enter your bundle id.
NOTES: Enter a correct bundle id as it will be use in URL schema to specify the callback URL.
Once completed, you will have your client id!
Shoot'nShare redirect URI for Google
Open Info.plist of your project as source code to see XML format and define
This URL has to be unique (making it match your bundle id ensures unicity) and has to match OAuth2 server side configuration.CFBundleURLTypes CFBundleURLSchemes org.aerogear.Shoot

Google sharing
Let's start by implementing sharing with Google. In Shoot/shoot/ViewController.swift go to shareWithGoogleDrive:
func shareWithGoogleDrive() {
        let googleConfig = GoogleConfig(
            clientId: "873670803862-g6pjsgt64gvp7r25edgf4154e8sld5nq.apps.googleusercontent.com",
            scopes:["https://www.googleapis.com/auth/drive"])

        let gdModule =  OAuth2Module(config: googleConfig)
        var http = Http()
        http.authzModule = gdModule

        gdModule.requestAccess { (response:AnyObject?, error:NSError?) -> Void in
            let filename = self.imageView.accessibilityIdentifier;
            let multiPartData = MultiPartData(data:UIImageJPEGRepresentation(self.imageView.image, 0.2),
                name: "image",
                filename: filename,
                mimeType: "image/jpg")
            http.POST("https://www.googleapis.com/upload/drive/v2/files", parameters: ["data": multiPartData], completionHandler: {(response, error) in
                if (error != nil) {
                    println("Error uploading file: \(error)")
                } else {
                    println("Successfully uploaded: " + response!.description)
                }
            })
        }
    }
In line 3 and 4, we use the client id (associated to Shoot Google app) and we specify the scope, here we share with google drive.
Line 6 and 7, we create an OAuth2 module. By default this module will create a TrustedSessionStorage to permanently store your tokens. Therefore every time your open your shoot app you can share photos without having to grant access everytime (see Notes below on iOS settings pre-requisites). You can choose a less secure MemorySessionStorage but each time you close your app and reopen it you will be prompted the first time to grant access.
Line 7 we initialize an http object and inject it the OAuth2 module.
In line 9, we actually request access. This method checks if the OAuth2Session (here stored in keychain) contains non-expired access token. If there is no token, it will go through the authorization code grant. If the token is expired (which happens every hour), a refreshed token will be asked transparently without any prompt.
NOTES: System requirement iOS8. Because this demo securely stores OAuth2 tokens in your iOS keychain, we've chosen to use WhenPasscodeSet policy for TrustedSessionStorage as a result to run this app you need to have your passcode set. For more details see WhenPasscodeSet blog post and Keychain and WhenPasscodeSet blog post.
Implicit http call
An even easier way to go, is to use aerogear-ios-http implicit grant. In the previous example we explicitly call requestAccess method. In Shoot/shoot/ViewController.swift change shareWithGoogleDrive by:func shareWithGoogleDrive() {
let googleConfig = GoogleConfig(
clientId: "873670803862-g6pjsgt64gvp7r25edgf4154e8sld5nq.apps.googleusercontent.com",
scopes:["https://www.googleapis.com/auth/drive"])
let gdModule = AccountManager.addGoogleAccount(googleConfig)
self.http.authzModule = gdModule
self.http.POST("https://www.googleapis.com/upload/drive/v2/files", parameters: self.extractImageAsMultipartParams(), completionHandler: {(response, error) in
if (error != nil) {
self.presentAlert("Error", message: error!.localizedDescription)
} else {
self.presentAlert("Success", message: "Successfully uploaded!")
}
})
}
In line 5, we use AccountManager to create an OAuth2 Module an factory method to create OAuth2 module.
In line 7, we just post our image to Google without having ask for access. POST method underneath checks if an OAuth2 module is plugged to http and will make the right call for you:
OAuth2 with Keycloak
Ready to build your own social network app, let's use Keycloak and build OAuth2 protected service...First of all, you can download Keycloak all appliance distribution.
Then, clone Shoot backend repo:
git clone https://github.com/aerogear/aerogear-backend-cookbook
cd aerogear-backend-cookbook/Shoot
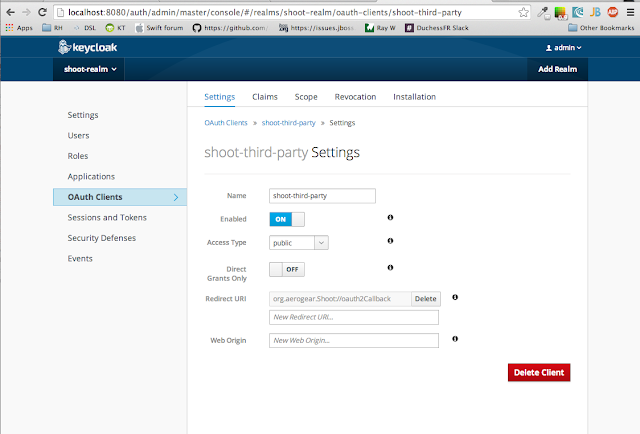
Following README instructions, import shoot-realm into Keycloak, your admin console should look like:

NOTE: Here too the redirect URI matches our bundle id. For Keycloak, you can put whatever you want but as we have Google config using bundle ID, let's reuse :)
Similar to the other providers, you can create your Keycloak OAuth2 module using AccountManager, simply use addAccount with the class type of your OAuth2 module, as shown below:
func shareWithKeycloak() {
        println("Perform photo upload with Keycloak")

        var keycloakConfig = Config(base: "http://localhost:8080/auth",
            authzEndpoint: "realms/shoot-realm/tokens/login",
            redirectURL: "org.aerogear.Shoot://oauth2Callback",
            accessTokenEndpoint: "realms/shoot-realm/tokens/access/codes",
            clientId: "shoot-third-party",
            refreshTokenEndpoint: "realms/shoot-realm/tokens/refresh",
            revokeTokenEndpoint: "realms/shoot-realm/tokens/logout")

        let gdModule = AccountManager.addAccount(keycloakConfig, moduleClass: KeycloakOAuth2Module.self)
        self.http.authzModule = gdModule
        self.performUpload("http://localhost:8080/shoot/rest/photos", parameters: self.extractImageAsMultipartParams())
    }
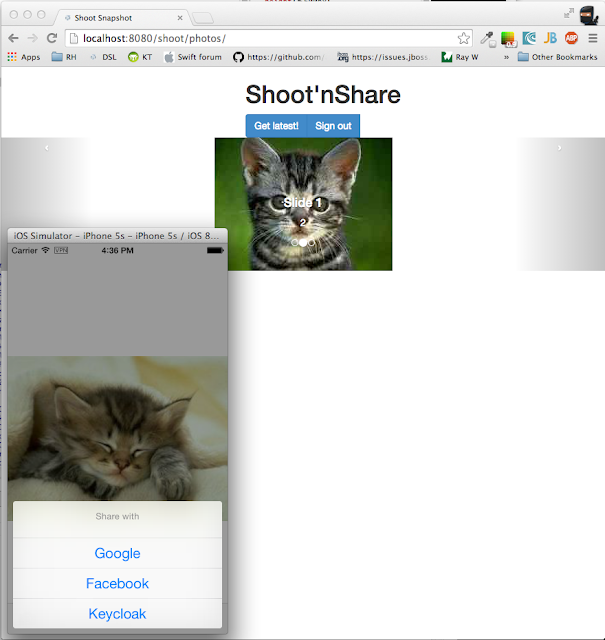
And that's it! Go and check uploaded pictures in shoot web-app:

Any feedback please drop us a line on AeroGear mailing list or contact Keycloak mailing list for more in-depth question on OAuth2/SSO server.
Happy OAuth2!
Tweet