Saturday, September 27, 2014

Authenticate with TouchID


Last blog, you saw how to store sensitive data in keychain and how to trigger touchID authentication when accessing them. In this post, you'll see how to use TouchID API for local authentication. No Keychain here.

I've used this KeychainWrapper in a small app KeychainTouchIDTest hosted on github very much inspired by the one used on session 711 of WWDC 2014. but this one is written in Swift ;)

Passcode Set

TouchId is used in complement to passcode feature. If you want to use it you will need to have your passcode set in your iOS8 settings.

LocalAuthentication and TouchID

In your AppDelegate.swift class, define promptTouchId method:
func promptTouchID() {
        var myContext = LAContext()
        var authError: NSError? = nil
        var myLocalizedReasonString:String = "Authenticate using your finger"
        if (myContext.canEvaluatePolicy(.DeviceOwnerAuthenticationWithBiometrics, error:&authError)) {   // [1]
            
            myContext.evaluatePolicy(.DeviceOwnerAuthenticationWithBiometrics,         // [2]
                localizedReason: myLocalizedReasonString,                              // [3]
                reply: {(success: Bool, error: NSError!)->() in
                    
                    if (success) {
                        println("User authenticated")
                    } else {
                        switch (error.code) {
                        case LAError.AuthenticationFailed.toRaw():
                            println("Authentication Failed")
                            
                        case LAError.UserCancel.toRaw():
                            println("User pressed Cancel button")
                            
                        case LAError.UserFallback.toRaw():                               // [4]
                            println("User pressed \"Enter Password\"")
                            
                        default:
                            
                            println("Touch ID is not configured")
                        }
                        
                    println("Authentication Fails");
                    let alert = UIAlertView(title: "Error", message: "Auth fails!", delegate: nil, cancelButtonTitle:"OK")
                    alert.show()
                }
            })
        } else {
            println("Can not evaluate Touch ID");
            let alert = UIAlertView(title: "Error", message: "Your passcode should be set!", delegate: nil, cancelButtonTitle:"OK")
            alert.show()
        }
    }
In [1], you first check wether passcode is set and touchId feature is available on this device.

In [2], you call the authentication process. DeviceOwnerAuthenticationWithBiometrics is an enum which (for now) contains only one value. But future will open room for other means of authentication, let's keep an eye on WWDC next sessions.

You can add an additional string in [3] which describes why you are doing this operation. You should always inform the user why he is prompted for Touch ID authentication.

Allow a user fallback in [4]. Your user might want to authenticate by other means than finger recognition. You will have to implement your own password strategy, passcode fallback is not yet available on programmable API.

To prompt at start-up, call promptTouchID method from application:didFinishLaunchingWithOptions: in AppDelegate:
func application(application: UIApplication, didFinishLaunchingWithOptions launchOptions: [NSObject: AnyObject]?) -> Bool {
        promptTouchID()
        return true
    }
I hope this serie of three posts: helped you get a view on what's new on TouchID and Keychain APIs on iOS8. Feel free to share your experience with it, I'd love to hear it.

Happy iOS8!

Sunday, September 14, 2014

TouchID and Keychain, iOS8 best friends

Last blog, we saw how to store sensitive data in iOS keychain and the different problems when switching from passcode on to passcode off set. Default access to keychain WhenUnlocked does not prevent access to keychain items when the device is not protected by passcode any more. In iOS8 with the new attribute kSecAttrAccessibleWhenPasscodeSetThisDeviceOnly, when trying to access keychain items, we end up with an error message if the device configuration set to passcode off. In this post, we'll go a step further in securing access to our sensitive data every times you access them. Welcome to TouchId.

TouchID: What is it?

It's a fingerprint recognition feature and is only available on the iPhone 5S and plus. Fingerprint data is stored on the secure enclave of the Apple A7 processor that is inside the device itself. To read more the existing and mysterious topic of secure enclave check apple security paper here.

If the user's phone has been rebooted, or has not been unlocked for 48 hours, only the user's passcode, not a fingerprint, can be used to unlock the phone.

Since iOS8, you can programatically use touchID APIs to:
  • either do local authentication,
  • or store in Keychain
  • Let's revisit our previous example hosted on github. We had the option to add an item in Keychain, update and read it. But we want to make sure every times the app reads the item the user is required to authenticate via touchID.

    Keychain Access with TouchID

    The existing ACL attributes on keychain:
  • kSecAttrAccessGroup: is used for WHAT are the apps which can access it. If you want the new keychain item to be shared among multiple applications, include the kSecAttrAccessGroup key
  • kSecAttrAccessible: expresses WHEN the user can access it. Among the different options: WhenUnlocked and the newbie WhenPascodeSet.
  • kSecAttrAccessControl: is for GRANTing. This is a new iOS8 attribute. It allows you to define a fine-grained access control. You use it with the method SecAccessControlCreateWithFlags. For now the enum contains only one value (but there will be room for more configuration) "UserPresence".
  • Let's code it, we're going to replace the generic createQuery by a more specific createQueryForAddItemWithTouchID for adding an item and createQueryForReadItemWithTouchID for retrieving it:
    func createQueryForAddItemWithTouchID(# key: String, value: String? = nil) -> NSMutableDictionary {
            var dataFromString: NSData? = value?.dataUsingEncoding(NSUTF8StringEncoding)
            var error:  Unmanaged?
            var sac: Unmanaged
            sac = SecAccessControlCreateWithFlags(kCFAllocatorDefault,
                        kSecAttrAccessibleWhenPasscodeSetThisDeviceOnly, .UserPresence, &error)
            let retrievedData = Unmanaged.fromOpaque(sac.toOpaque()).takeUnretainedValue()
            
            var keychainQuery = NSMutableDictionary()
            keychainQuery[kSecClass] = kSecClassGenericPassword
            keychainQuery[kSecAttrService] = self.serviceIdentifier
            keychainQuery[kSecAttrAccount] = key
            keychainQuery[kSecAttrAccessControl] = retrievedData
            keychainQuery[kSecUseNoAuthenticationUI] = true
            if let unwrapped = dataFromString {
                keychainQuery[kSecValueData] = unwrapped
            }
            return keychainQuery
        }
    
    Line 4, we create an AccessControl object with the policy set to kSecAttrAccessibleWhenPasscodeSetThisDeviceOnly. Note the flag item is set to the only possible UserPresence. we set the attribute kSecUseNoAuthenticationUI because we don't want to be prompted on Add.

    Read Keychain with TouchID popping up

    For the read, we only need to customize the pop-up window content with the attribute kSecUseOperationPrompt.
    func createQueryForReadItemWithTouchID(# key: String, value: String? = nil) -> NSMutableDictionary {
            var dataFromString: NSData? = value?.dataUsingEncoding(NSUTF8StringEncoding)
    
            
            var keychainQuery = NSMutableDictionary()
            keychainQuery[kSecClass] = kSecClassGenericPassword
            keychainQuery[kSecAttrService] = self.serviceIdentifier
            keychainQuery[kSecAttrAccount] = key
    
            keychainQuery[kSecUseOperationPrompt] = "Do you really want to access the item?"
            keychainQuery[kSecReturnData] = true
            
            return keychainQuery
        }
    
    Things to remember

    Accessibility and AccessControl work together. One key implication of using TouchID and Keychain is: the user has to authenticate using standard UI, therefore the app must be in foreground. Be aware that broad queries on Keychain may request items that need user auth. Last but not least, the keychains items stored using kSecAttrAccessibleWhenPasscodeSetThisDeviceOnly are not synchronised or back-up on iCloud.

    That's all for today, next blog post we can see how to use TouchID for LocalAuthentication and how to fallback when touchID is not available. Stay tuned!

    Happy iOS8, Happy Swift!

    Friday, September 12, 2014

    New kids on the block: WhenPasscodeSet policy on iOS8

    ... oki, its real name, a bit less glamour, is kSecAttrAccessibleWhenPasscodeSetThisDeviceOnly.

    TL;TR: What is it all about? A cool option which let you save sensitive data on Keychain only if the user's device configuration is set with passcode on. It's up to Keychain to deal with configuration changes (ie: user changes his phone's configuration from passcode on to passcode off) in a secure way.

    Keychain

    Keychain is a database, whose rows are called Keychain items. Keychain items have values, and those values are encrypted. You define keychain with attributes to later help you do queries. Typically Keychain is used to store passwords or encryption key, not large amount of data.

    Keychain exists in OS X version and iOS version. Those versions are quire different. Here we're going to focus on iOS.

    iOS Keychain

    In iOS, an application always has access to its own keychain items and does not have access to any other application’s items. The system generates its own password for the keychain (no prompt for password), and stores the key on the device in such a way that it is not accessible to any application.

    When a user backs up iPhone data, the keychain data is backed up but the secrets in the keychain remain encrypted in the backup. The keychain password is not included in the backup. Therefore, passwords and other secrets stored in the keychain on the iPhone cannot be used by someone who gains access to an iPhone backup.

    All keychain items are protected by user's passcode plus device secret (unique secret for each UID only known by the device itself). An encrypted iCloud backup is available in case of stolen device.

    Keychain wrapper

    Here is a simple KeychainWrapper, that let you save a key/value item, in Swift, of course :)
    public class KeychainWrap {
        public var serviceIdentifier: String
        
        public init() {
            if let bundle = NSBundle.mainBundle().bundleIdentifier {
                self.serviceIdentifier = bundle
            } else {
                self.serviceIdentifier = "unkown"
            }
        }
        
        func createQuery(# key: String, value: String? = nil) -> NSMutableDictionary {
            var dataFromString: NSData? = value?.dataUsingEncoding(NSUTF8StringEncoding)
            var keychainQuery = NSMutableDictionary()
            keychainQuery[kSecClass] = kSecClassGenericPassword
            keychainQuery[kSecAttrService] = self.serviceIdentifier
            keychainQuery[kSecAttrAccount] = key
            //keychainQuery[kSecAttrAccessible] = kSecAttrAccessibleWhenPasscodeSetThisDeviceOnly
            if let unwrapped = dataFromString {
                keychainQuery[kSecValueData] = unwrapped
            } else {
                keychainQuery[kSecReturnData] = true
            }
            return keychainQuery
        }
        
        public func addKey(key: String, value: String) -> Int {
            var statusAdd: OSStatus = SecItemAdd(createQuery(key: key, value: value), nil)
            return Int(statusAdd)
        }
        
        public func updateKey(key: String, value: String) -> Int {
            let attributesToUpdate = NSMutableDictionary()
            attributesToUpdate[kSecValueData] = value.dataUsingEncoding(NSUTF8StringEncoding)!
            var status: OSStatus = SecItemUpdate(createQuery(key: key, value: value), attributesToUpdate)
            return Int(status)
        }
        
        public func readKey(key: String) -> NSString? {
            
            var dataTypeRef: Unmanaged?
            let status: OSStatus = SecItemCopyMatching(createQuery(key: key), &dataTypeRef)
            
            var contentsOfKeychain: NSString?
            if (Int(status) != errSecSuccess) {
                contentsOfKeychain = "\(Int(status))"
                return contentsOfKeychain
            }
            
            let opaque = dataTypeRef?.toOpaque()
            if let op = opaque? {
                let retrievedData = Unmanaged.fromOpaque(op).takeUnretainedValue()
                // Convert the data retrieved from the keychain into a string
                contentsOfKeychain = NSString(data: retrievedData, encoding: NSUTF8StringEncoding)
            } else {
                println("Nothing was retrieved from the keychain. Status code \(status)")
            }
            
            return contentsOfKeychain
        }
    }
    
    Here we defined addKey, updateKey and readKey. I also provide a resetAll method (not shown in code snippet but use source code for reference). As line 18 is commented out, we're on kSecAttrAccessibleWhenUnlocked accessibility mode, the one per default.

    I've used this KeychainWrapper in a small app KeychainTouchIDTest hosted on github very much inspired by the one used on session 711 of WWDC 2014. Now it's time to play with it and see how it behaves...

    Let's play On/Off game

    WhenUnlocked policy for keychain (with line 18 commented)
    • in Settings -> TouchID & Passcode, choose "Turn passcode on"
    • start KeychainTouchIDTest
    • click Add item, should return success
    • click Query item, should return success
    • in Settings -> TouchID & Passcode, choose "Turn passcode off"
    • switch to KeychainTouchIDTest
    • click Add item, should return success
    • click Query item, should return success
    Here you touch the problem, you initially saved your credit car number in a very secure place (keychain), your phone being secured with passcode but as you remove authentication (passcode off) from you phone configuration, what happens?

    You left the door wide open. Anyone can take you phone and use your credit card! Let's carry on doing some more testing to see how WhenPasswordSet behaves...

    WhenPasscodeSet policy for keychain (with line 18 uncommented)
    • in Settings -> TouchID & Passcode, choose "Turn passcode on"
    • switch to KeychainTouchIDTest
    • click reset all
    • click Add item, should return success
    • click Query item, should return success
    • in Settings -> TouchID & Passcode, choose "Turn passcode off"
    • click Query item, should return not found error
    • click Add item, should return error
    Much more secure.
    Since you changed your passcode configuration to off, Keychain has securely removed the sensitive data. Switching it back to passcode on will not restore them. They're gone for good.

    One step further: TouchID

    Suppose you want to authenticate every times this sensitive data is accessed. Let's say it's a credit card information and you want to approve all transaction personally. In iOS8 it's possible using WhenPasscodeSet's little friend API: TouchID!

    I won't spoil the pleasure after a too long blog, this will be for a second post. Stay tuned!

    Sunday, September 7, 2014

    Meet my new friend: Charles

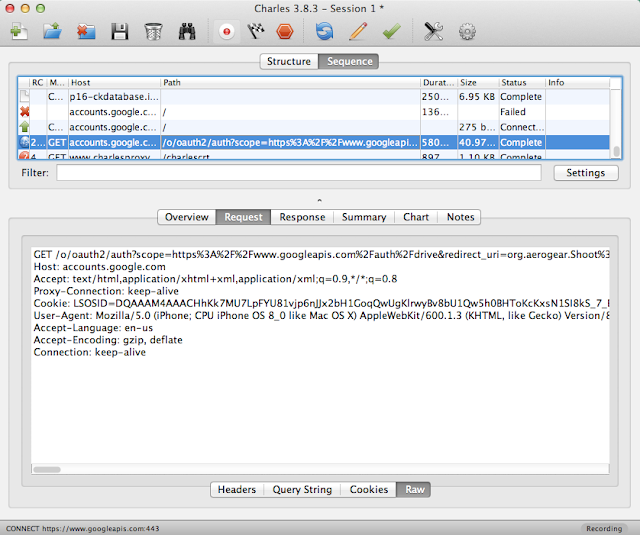
    Last week, while coding/debugging some https code on iPhone, I was looking for a tool to simply display the request/response and http headers running on mac.

    I met Charles. Charles is an HTTP proxy that let you view all of the HTTP and SSL / HTTPS traffic between their machine (or phone) and the Internet. Here is a sample doc on how to configure it to view requests sent from your device.

    http proxy set up

    To set up Charles as a proxy for spying http traffic on your iPhone


    • Go to Settings -> Wifi, on your wifi name select info
    • Enter your IP + port 8888
    • Open Charles on you mac


    Note: Once you finished your work and you closed Charles app, remember to switch off the proxy settings otherwise your internet connection won't work.

    SSL setup

    To use Charles with SSL, simply:
    • Get a certificate for your phone: open a browser go to http://www.charlesproxy.com/charles.crt
    • Install it, you will be prompted to enter your passcode
    • On your mac, go to Charles menu: Proxy ->Proxy settings… -> SSL tab and the https address (for ex: account.google.com:443) or a generic wild character
    You're ready to fire, and you can browser your call:


    Charles you're a great friend though not an open source dude, you have a license fee. If you're looking on open source side you have Wireshark option, but on mac it means installing X11 separately and a bit more work to configure SSL.