GroogleDrive app displays the list of documents in your Google Drive using OAuth2 to authorize with aerogear-ios library.
Let's do Google setup
Before we start you will need to register your app, follow the steps below:1. Have a Google account
2. Go to Google cloud console, create a new project
3. Go to APIs & auth menu, then select APIs and turn on Drive API
4. Always in APIs & auth menu, select Credentials and hit create new client id button Select iOS client and enter your bundle id. Enter a correct bundle id as it will be use in URL schema (if you don't know about URL Schemas I suggest you read about it) to specify the callback URL.
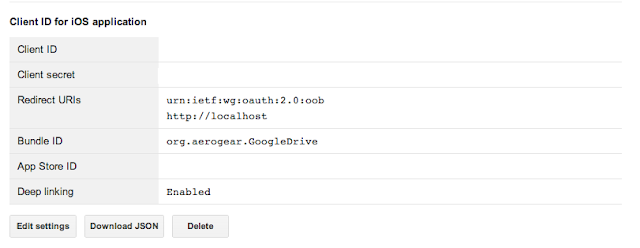
Once completed you will have your information displayed as below:

You'll get a Client Id, a Client Secret and a callback URL, open Xcode (or AppCode whathever you like best), go to GoogleDrive-Info.plist and add an new URL schema entry as shown below:

Show me the code
In AGViewController.m:
- (IBAction)authorize:(UIButton *)sender {
    AGAuthorizer* authorizer = [AGAuthorizer authorizer];

    _restAuthzModule = [authorizer authz:^(id config) {              [1]
        config.name = @"restAuthMod";
        config.baseURL = [[NSURL alloc] initWithString:@"https://accounts.google.com"];
        config.authzEndpoint = @"/o/oauth2/auth";
        config.accessTokenEndpoint = @"/o/oauth2/token";
        config.clientId = @"XXXXX";
        config.redirectURL = @"org.aerogear.GoogleDrive:/oauth2Callback";
        config.scopes = @[@"https://www.googleapis.com/auth/drive"];
    }];

    [_restAuthzModule requestAccessSuccess:^(id object) {                           [2]
        [self fetchGoogleDriveDocuments:_restAuthzModule];                          [4]
    } failure:^(NSError *error) {
    }];
}
[1]: configuration with all required URLs and endpoints.[2]: requestAccessSuccess:failure: is the method dealing with all the steps needed to authorize. Within this method, we're going to bring the UI grant web page, once authorization is granted, we go back to the mobile app and then we exchange code for access token. this is the heart of OAuth2 dance ;)
In AGAppDelegate.m:
- (BOOL)application:(UIApplication *)application
            openURL:(NSURL *)url
  sourceApplication:(NSString *)sourceApplication
         annotation:(id)annotation
{                                                                                   [3]
    NSNotification *notification = [NSNotification notificationWithName:@"AGAppLaunchedWithURLNotification"
    object:nil userInfo:[NSDictionary dictionaryWithObject:url forKey:@"UIApplicationLaunchOptionsURLKey"]];
    [[NSNotificationCenter defaultCenter] postNotification:notification];

    return YES;
}
[3]: once popup has been answered, go back to GoogleDrive app and notified AeroGear framework. If this method is not well implemented, the browser won't be able to callback the application. Back to the app, access code is excahnge with access token (step 2).[4]: the success callback takes the access token as parameter. The access token is stored in memory with AGAuthzModule. It's up to the developer to store permanently the access token for next app launch. Note that access token has an expiration date (1h for Google).
In AGViewController.m:
-(void)fetchGoogleDriveDocuments:(id[5]: create your Pipeline and Pipe objects as usual.) authzModule { NSString* readGoogleDriveURL = @"https://www.googleapis.com/drive/v2"; NSURL* serverURL = [NSURL URLWithString:readGoogleDriveURL]; AGPipeline* googleDocuments = [AGPipeline pipelineWithBaseURL:serverURL]; id documents = [googleDocuments pipe:^(id config) { [5] [config setName:@"files"]; [config setAuthzModule:authzModule]; [6] }]; [documents read:^(id responseObject) { [7] _documents = [[self buildDocumentList:responseObject[0]] copy]; [self.tableView reloadData]; } failure:^(NSError *error) { // when an error occurs... at least log it to the console.. NSLog(@"Read: An error occured! \n%@", error); }]; }
[6]: setting authz module in your pipe configuration will pass the access token for each pipe operations transparently.
[7]: read the pipe as usual.
As a conclusion
No need to learn and use different providers SDK, Aerogear-iOS library allows you to use OAuth2 with any providers. Once you're authorized, you can use the pipes transparently (no need for you to pass the access token, the framework does it for you).OAuth2 will be shipped in 1.4.0. Give it a trial, give us your feedback and enjoy!
Tweet
No comments:
Post a Comment
Note: Only a member of this blog may post a comment.