Tuesday, April 19, 2016

Watch tutorial 6: Watch Connectivity - Application Context

This post is part of a set of short tutorials on Watch. If you want to see the previous post. In this tutorial, you're going to see how you can communicate between your Watch and your iOS app using Application Context.

Get starter project

In case you missed Watch tutorial 5: Watch Connectivity - Direct Message, here are the instructions how to get the starter project. Clone and get the initial project by running:
git clone https://github.com/corinnekrych/DoItCoach.git
cd DoItCoach
git checkout step5
open DoItCoach.xcodeproj

Send Application context from Phone

In DoItCoach/DetailedTaskViewController.swift, search for the method timerStarted(_:), and add one line of code in [1]:
func sendTaskToAppleWatch(task: TaskActivity) {
  if WCSession.defaultSession().paired && delegate.session.watchAppInstalled {    // [1]
    try! delegate.session.updateApplicationContext(["task": task.toDictionary()]) // [2]
  }
}
[1]: Before sending to the Watch, as a best practice, check is the Watch is paired and the app in installed on the Watch. No need to do a context update when it's doomed to failure.
[2]: You send the Context update. Here your don't try catch, but you could do it and display the error.

You need to import WatchConnectivity to make Xcode happy.
Still in DoItCoach/DetailedTaskViewController.swift call sendTaskToAppleWatch(_:) in timerStarted(_:) as done in [1] (Note all the rest of the method is unchanged):
@objc public func timerStarted(note: NSNotification) {
  if let userInfo = note.object, 
     let taskFromNotification = userInfo["task"] as? TaskActivity 
     where taskFromNotification.name == self.task.name {
     if let sender = userInfo["sender"] as? String 
         where sender == "ios" {
         task.start()
         sendTaskToAppleWatch(task) // [1]
     }
     saveTasks()
     self.startButton.setTitle("Stop", forState: .Normal)
     self.startButton.setTitle("Stop", forState: .Selected)
     self.circleView.animateCircle(0, color: taskFromNotification.type.color, 
                                   duration: taskFromNotification.duration)
  }
  print("iOS app::TimerStarted::note::\(note)")
}

Receive Message in Watch app

In DoItCoach WatchKit Extension/ExtensionDelegate.swift, at the end of the class definition, add the following extension declaration:
// MARK: WCSessionDelegate
extension ExtensionDelegate: WCSessionDelegate {
  func session(session: WCSession, didReceiveApplicationContext applicationContext: [String : AnyObject]) {
    if let task = applicationContext["task"] as? [String : AnyObject] { // [1]
      if let name = task["name"] as? String,
         let startDate = task["startDate"] as? Double {
         let tasksFound = TasksManager.instance.tasks?.filter{$0.name == name} // [2]
         let task: TaskActivity?
         if let tasksFound = tasksFound where tasksFound.count > 0 {
           task = tasksFound[0] as TaskActivity
           task?.startDate = NSDate(timeIntervalSinceReferenceDate: startDate)  // [3]
           dispatch_async(dispatch_get_main_queue()) {  // [4]
             NSNotificationCenter.defaultCenter().postNotificationName("CurrentTaskStarted", 
                                                                       object: ["task":task!])
           }
         }
       }
     }
  }
}
[1]: You get the dictionary definition of the task that was started on the iPhone.
[2]: You find its matching Task object in the list of tasks in the Watch.
[3]: You assign the startDate defined on the iOS app.
[4]: You make sure you go to UI thread to send a notification for the Watch to refresh its display.

Refreshing Watch display

In DoItCoach WatchKit Extension/InterfaceController.swift in awakeWithContext(_:), add one line of code [1] to register to the event CurrentTaskStarted:
override func awakeWithContext(context: AnyObject?) {
  super.awakeWithContext(context)
  NSNotificationCenter.defaultCenter()  // [1]
                      .addObserver(self, 
                                   selector: #selector(InterfaceController.taskStarted(_:)), 
                                   name: "CurrentTaskStarted", 
                                   object: nil)
  display(TasksManager.instance.currentTask)
}
Still in DoItCoach WatchKit Extension/InterfaceController.swift implement the following methods to respond to the NSNotificationCenter event:
func taskStarted(note: NSNotification) { 
  if let userInfo = note.object,  
     let taskFromNotification = userInfo["task"] as? TaskActivity,
     let current = TasksManager.instance.currentTask
     where taskFromNotification.name == current.name { 
    replayAnimation(taskFromNotification)           // [1]
  }
}
    
func replayAnimation(task: TaskActivity) {
  if let startDate = task.startDate  {
    let timeElapsed = NSDate().timeIntervalSinceDate(startDate) 
    let diff = timeElapsed < 0 ? abs(timeElapsed) : timeElapsed
    let imageRangeRemaining = (diff)*90/task.duration   // [2]
    self.group.setBackgroundImageNamed("Time")
    self.group.startAnimatingWithImagesInRange(NSMakeRange(Int(imageRangeRemaining), 90), 
               duration: task.duration - diff, repeatCount: 1) // [3]
  }
}
[1]: For the current task, replay the animation.
[2]: Calculate how much is images is already started. You will have a short delay since the task was started in the iPhone and you received it on the Watch.
[3]: As you've seen in Tutorial3: Animation, launch the animation.

Build and Run

You can now start a task from your phone. The careful reader that you are, will notice that once a task started from the phone is completed, it is not refreshed on the Watch app. That brings us to the next section, let's talk about your challenges.

Challenges left to do

Your mission, should you choose to accept it is:
  • make the task list refreshed on the Watch when a task started from your phone get completed
  • remove the bootstrap code in TaskManager.swift. All tasks should be persisted to the iPhone (all the persistence code is already written for you in Task.swift). When the iPhone app launch send the list of tasks to Watch. Whenever a task is added on the phone, send the list of tasks to the watch.
  • make the animation carries on where it should be when the Watch app go background and foreground again.

Get final project

If you want to check the final project, here are the instructions how to get it.
cd DoItCoach
git checkout step6
open DoItCoach.xcodeproj
Or if you want to get the final project with all the challenges implemented:
cd DoItCoach
git checkout master
open DoItCoach.xcodeproj

What's next?

With this tutorial, you saw how you can send update application context messages from your Watch to your phone. Since you know how to communicate between your app and your watch, you're all ready to make great apps!

Watch tutorial 5: Watch Connectivity - Direct Message

This post is part of a set of short tutorials on Watch. If you want to see the previous post. In this tutorial, you're going to see how you can communicate between your Watch and your iOS app.

How does my Watch talk to my phone, and vice versa?

WatchConnectivity framework provides different options for implementing a bi-directional communication between WatchKit and iOS apps.
  • Application Context Mode: allows exchange of data serialized in a dictionary object from one app and another. The transfer is done in the background. The messages are queued and delivered to the receiving app via a delegate method. One specificity of Application Context mode is that only the latest update is sent (ie: older data is overwritten by the new data). This is perfect if the receiving app only need the latest state.
  • User Information transfer mode is similar to application context mode. It is also a background mode, message get queued and unlike application context all messages will be sent once the destination app is available.
  • Interactive messaging mode sends messages (serialized in dictionary) immediately to the receiving app. The receiving app is notified of the message arrival via a delegate method call.
Whether you send a message from your iOS app or from your Watch app, the method to call is the same on both devices. Similarly when you receive a remote call the delegate method to use is the same. You'll get the "déjà vu" feeling when developing with WatchConnectivity especially for bi-directional messages.

Although, there is a symmetry of usage of WatchConnectivity framework, choosing which option to use (queued messages vs direct messages) really depends on your use case and where do you send it from. Time to dig into the nitty-gritty of Direct Messages.

Get starter project

In case you missed Watch tutorial 4: Animation, here are the instructions how to get the starter project. Clone and get the initial project by running:
git clone https://github.com/corinnekrych/DoItCoach.git
cd DoItCoach
git checkout step4
open DoItCoach.xcodeproj

The Use Case

Let's start using WatchConnectivity with this use case in mind. You want to start the task on your Watch and be able to see it as started on your iPhone. From Apple Documentation:

Calling this method from your WatchKit extension while it is active and running wakes up the corresponding iOS app in the background and makes it reachable. Calling this method from your iOS app does not wake up the corresponding WatchKit extension. If you call this method and the counterpart is unreachable (or becomes unreachable before the message is delivered), the errorHandler block is executed with an appropriate error. The errorHandler block may also be called if the message parameter contains non property list data types.

If I call sendMessage(_:replyHandler:) from my Watch, it has the ability to wake-up my iOS app. How cool!

I prefer to use Direct Messages for actions from the watch -> iPhone. The other way around iPhone -> Watch is less useful, as the chances that your Watch app is active when you send DM from your phone is slim.

Direct Message from the Watch to your Phone are useful to say "hi phone, go fetch me these resources", but bear in mind, they are not queued, so if your phone is switch off or out of range, they fail and will not be delivered.

As a rule of thumb, when synchronizing data use Application Context or UserInfo. We could have used ApplicationContext, but we'll design DoITCoach Watch App to be a companion app of the watch. All the states are persisted on the Phone.

Initialise WCSession

WCSession.defaultSession() returns a singleton object. You still need to define which object will handle delegate methods and activate the session.

Where?

For the Watch app, the best place to do it is ExtensionDelegate.swift as this is the place where the life cycle of the app takes place.

How?

In DoItCoach WatchKit App Extension/ExtensionDelegate.swift, add the import:
import WatchConnectivity
var session : WCSession!
func applicationDidFinishLaunching() {
  // Perform any final initialization of your application.
  if (WCSession.isSupported()) {
    session = WCSession.defaultSession()
    session.delegate = self
    session.activateSession()
  }
}
The compiler is now complaining because your class has to implement WCSessionDelegate. In DoItCoach WatchKit App Extension/ExtensionDelegate.swift afte3r the calss definition, add the extension declaration:

extension ExtensionDelegate: WCSessionDelegate {}

Send DM from Watch to Phone

In DoItCoach Watch Extension/InterfaceController.swift add the method to do the send:
func sendToPhone(task: TaskActivity) {
  let applicationData = ["task": task.toDictionary()]
  if session.reachable { // [1]
    session.sendMessage(applicationData, replyHandler: {(dict: [String : AnyObject]) -> Void in
      // handle reply from iPhone app here
      print("iOS APP KNOWS Watch \(dict)")
    }, errorHandler: {(error) -> Void in
      // catch any errors here
      print("OOPs... Watch \(error)")
    })
  } 
}
At the beginning of the file add an import WatchConnectivity.

[1]: As a best practice, you can check the app on iOS device is reachable so you don't waste a call.

Still in DoItCoach Watch Extension/InterfaceController.swift call sendToPhone(_:) in onStartButton() as done in [1] (Note all the onStartButton is unchanged):
@IBAction func onStartButton() {
  guard let currentTask = TasksManager.instance.currentTask else {return} 
  if !currentTask.isStarted() { 
    let duration = NSDate(timeIntervalSinceNow: currentTask.duration)
    timer.setDate(duration)
    // Timer fired
    NSTimer.scheduledTimerWithTimeInterval(currentTask.duration,
                                           target: self,
                                           selector: #selector(NSTimer.fire),
                                           userInfo: nil,
                                           repeats: false) 
    timer.start() 
    // Animate
    group.setBackgroundImageNamed("Time")
    group.startAnimatingWithImagesInRange(NSMakeRange(0, 90), duration: currentTask.duration, repeatCount: 1)
    currentTask.start()
    startButtonImage.setHidden(true) 
    timer.setHidden(false) 
    taskNameLabel.setText(currentTask.name)
    sendToPhone(currentTask) // [1]
  }
}
You also need to send a message to your phone once the task is finished in [1]:
func fire() {
  timer.stop()
  startButtonImage.setHidden(false)
  timer.setHidden(true)
  guard let current = tasksMgr.currentTask else {return}
  print("FIRE: \(current.name)")
  current.stop()
  group.stopAnimating()
  // init for next
  group.setBackgroundImageNamed("Time0")
  display(tasksMgr.currentTask)
  sendToPhone(current) // [1]
}

Receive Message in iOS app


Where?

For the iOS app, the best place to do it is AppDelegate.swift as this is the place where the life cycle of the app takes place. You want to be able to receive direct message even when your iOS app is not started.

How?

var session : WCSession!
func application(application: UIApplication, didFinishLaunchingWithOptions launchOptions: [NSObject: AnyObject]?) -> Bool {
  if (WCSession.isSupported()) {
    session = WCSession.defaultSession()
    session.delegate = self
    session.activateSession()
  }
  return true
}
Don't forget to import WatchConnectivity.
Déjà vu feeling?
;)

Delegate implementation

// MARK: WCSessionDelegate
extension AppDelegate: WCSessionDelegate {
  func session(session: WCSession, didReceiveMessage message: [String : AnyObject], replyHandler: ([String : AnyObject]) -> Void) {
    print("RECEIVED ON IOS: \(message)")
    dispatch_async(dispatch_get_main_queue()) { // [1]
      if let taskMessage = message["task"] as? [String : AnyObject] {
        if let taskName = taskMessage["name"] as? String {
          let tasksFiltered = TasksManager.instance.tasks?.filter {$0.name == taskName}
          guard let tasks = tasksFiltered else {return}
          let task = tasks[0]                   // [2]
          if task.isStarted() {
            replyHandler(["taskId": task.name, "status": "already started"])
            return
          }
          if task.endDate != nil {
            replyHandler(["taskId": task.name, "status": "already finished"])
            return
          }
          if let endDate = taskMessage["endDate"] as? Double {
            task.endDate = NSDate(timeIntervalSinceReferenceDate: endDate)
            replyHandler(["taskId": task.name, "status": "finished ok"])
            NSNotificationCenter.defaultCenter().postNotificationName("TimerFired", // [3]
                                                 object: ["task":self])
          } else if let startDate = taskMessage["startDate"] as? Double {
              task.startDate = NSDate(timeIntervalSinceReferenceDate: startDate)
              replyHandler(["taskId": task.name, "status": "started ok"])
          }
          saveTasks()    // [4]
        }
      }
    }
  }
}
[1]: You need to dispatch to main thread as eventually we want to refresh the UITableView in the UI queue.
[2]: You get the task name from the dictionary. You find the matching task in iOS app (task name is used as an identifier).
[3]: You set either startDate or endDate on the task itself. When you end the task, you need to issue an event so that UITableView get refreshed.
[4]: You save all tasks.

Get final project

If you want to check the final project, here are the instructions how to get it.
cd DoItCoach
git checkout step5
open DoItCoach.xcodeproj


Build and Run

Before launching the app, delete any previous version of DoItCoach on your Phone.


What's next?

With this tutorial, you saw how you can send direct messages from your phone to your watch. As you've seen, you can do a lot with direct message: wake up an iOS app but there are still cases where your message won't reach your phone. When it comes to synchronise states between AppleWatch and its iPhone companion app, Application Context or User Info transfer mode are much more suitable. See Watch tutorial 6: Watch Connectivity (Application Context) to learn more.

Watch tutorial 4: Animation

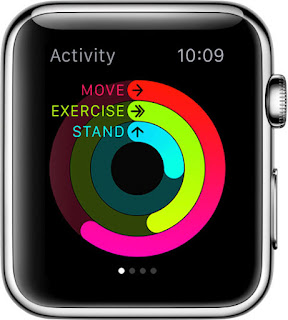
This post is part of a set of short tutorials on Watch. If you want to see the previous post. In this tutorial, you're going to create ring animation that looks like the one in the Activity app.


The different types of animations

Like we've seen with Layout, animations on the AppleWatch are very simple. There are two main types of animations in WatchKit: property animations and animated images.
  • Properties animation is limited to some properties of of UI elements like: width/height, alpha, background color, inset.
  • Animated images is simply a set of images. When you run them quickly, your eyes see them as animated: the basic of cartoon animation :)

Build your images

When I first started on AppleWatch, I searched for this cool ring (that is used in Activity app) in the UI control list without success. It is not part of the start ui controls. You can do such animation but you've got to build your own imagines.

After googling, I found this interesting project: RadialChartImageGenerator which also comes with some online tooling available to generate the images. Ah the joy of open source! Let's use the tool to generate our images.

  • Go to RadialChartImageGenerator online tool
  • Select the single Arc
  • For Current and Max value select 90
  • Select the color that match task color. You can start with dark blue and go clearer. (See image below for color reference)
  • At the bottom, untick Show Text and Subtext. You only need a empty ring set of images. As you deal with timer programmatically.
  • Hit Generate Images button, the images are downloaded in you download folder


Get starter project

In case you missed Watch tutorial 3: Layout, here are the instructions how to get the starter project. Clone and get the initial project by running:
git clone https://github.com/corinnekrych/DoItCoach.git
cd DoItCoach
git checkout step3
open DoItCoach.xcodeproj

Add images to Xcode project

From the previous tutorial, you should have the animation images already populated in HOME_DIR/DoItCoach/DoItCoach WatchKit App/Assets.xcassets folder.

Optionally if you want to add your own ring generated images:
  • Create a new folder in Asserts.xcassets, name it TimeSpent,
  • copy your images here. You should get something like this.

Animate your images

You can animate all object that conform to WKImageAnimatable.
You are going to animate the background image of the main Group.

In DoItCoach WachKit Extension, go to InterfaceController.swift, go to the onStartButton and add the following 2 lines of code:
group.setBackgroundImageNamed("Time")
group.startAnimatingWithImagesInRange(NSMakeRange(0, 90), duration: currentActivity.duration, repeatCount: 1)
The final method should look like:
@IBAction func onStartButton() {
  guard let currentTask = TasksManager.instance.currentTask else {return}
  if !currentTask.isStarted() {
    let duration = NSDate(timeIntervalSinceNow: currentTask.duration)
    timer.setDate(duration)
    timer.start()
    currentTask.start()
    group.setBackgroundImageNamed("Time")
    group.startAnimatingWithImagesInRange(NSMakeRange(0, 90), duration: currentTask.duration, repeatCount: 1)
    startButtonImage.setHidden(true)
    timer.setHidden(false)
    taskNameLabel.setText(currentTask.name)
  }
}
Well done! You get your timer animation done!

Go to next task

Once the timer is fired, your Watch should display the next task on the list.

The UI Timer object does not provide a fire method. So to trigger an event once the the task is done, you have to add a NSTimer object.
@IBAction func onStartButton() {
   guard let currentTask = TasksManager.instance.currentTask else {return} 
   if !currentTask.isStarted() { 
      let duration = NSDate(timeIntervalSinceNow: currentTask.duration)
      timer.setDate(duration)
      // Timer to fire event
      NSTimer.scheduledTimerWithTimeInterval(currentTask.duration,
                                             target: self,
                                             selector: #selector(NSTimer.fire),
                                             userInfo: nil,
                                             repeats: false) // [2]
      timer.start() 
      // Animate
      group.setBackgroundImageNamed("Time")
      group.startAnimatingWithImagesInRange(NSMakeRange(0, 90), duration: currentTask.duration, repeatCount: 1)
      currentTask.start()
      startButtonImage.setHidden(true) 
      timer.setHidden(false) 
      taskNameLabel.setText(currentTask.name)
   }
}
func fire() {  // [2]
  timer.stop()
  startButtonImage.setHidden(false)
  timer.setHidden(true)
  guard let current = TasksManager.instance.currentTask else {return}
  current.stop()
  group.stopAnimating()
  display(TasksManager.instance.currentTask)
}

func display(task: Task?) {
  guard let task = task else {
    taskNameLabel.setText("NOTHING TO DO :)")
    timer.setHidden(true)
    startButtonImage.setHidden(true)
    return
  }
  group.setBackgroundImageNamed("Time0") // [3]
  taskNameLabel.setText(task.name)
}
  • [1]: start an timer that is used to refresh UI display. Note the the Timer UI component can not be associated to a fires method.
  • [2]: in the fire method, you need to display start button, hide timer info, stop the animation and display the next task.
  • [3]: to initialise the Group background image to the initial image
Hooray, your timer starts, animate and go to the next task! Victory.

Animation and Watch App life cycle

For the need of testing DoItCoach, we made the timer duration to 10 seconds. In real life, the timer would be of 25 mins. Your AppleWatch won't say in foreground the whole duration of the task. You need to take care of replaying the animation in willActivate() in InterfaceController.swift. You will have to calculate the remaining time and make it match the image number for your animation. This is your challenge!

Get final project

If you want to check the final project, here are the instructions how to get it.
cd DoItCoach
git checkout step4
open DoItCoach.xcodeproj

What's next?

With this first introduction tutorial, you saw how you can do animation that look like the Activity app on your AppleWatch app. In the iOS app we can also see task in progress by selection the task in the table view. what about if the task has been started with the watch. wouldn't be nice to see it running on both AppleWatch and iOs app?

This is time to talk about WatchConnectivy! See Watch tutorial 5: Watch Connectivity (Direct Message)

Monday, April 18, 2016

Watch tutorial 3: Layout

This post is part of a set of short tutorials on Watch. If you want to see the previous post. In this tutorial, you're going to layout the screen needed to start the task from your Watch.

Are you a AutoLayout Guru?

Good. From Apple documentation:

Watch apps do not use the same layout model used by iOS apps. When assembling the scenes for your Watch app interface, Xcode arranges items for you, stacking them vertically on different lines. At runtime, Apple Watch takes those elements and lays them out based on the available space.

For Watch, you won't use AutoLayout!!!

AppleWatch Layout is much basic and therefore much easier to use :)

You must use storyboards to design your interfaces. Remember that storyboard is part of the WatchKit app bundle. Everything is laid down in storyboard, you won't be able to access a position coordinate at runtime. To me, Watch layout looks much more like box driven ie: CSS-like rather than constraints based Layout ie: iOS-like.

Get starter project

In case you missed Watch tutorial 2: Watch Architecture, here are the instructions how to get the starter project. Clone and get the initial project by running:
git clone https://github.com/corinnekrych/DoItCoach.git
cd DoItCoach
git checkout step2
open DoItCoach.xcodeproj

Laying out first screen


Add image resource

Download the Asset.assets folder from the final repo. In Finder copy paste Assets.xcassets folder into your project Watch App folder ie: /DoItCoach/DoItCoach WatchKit App/.

In DoItCoach WatchKit App in Project Navigator, select Assets.xcassets, should see the new images:


You're done with the images, let's go to DoItCoach WatchKit App's storyboard.

Start button layout

To be able to start the timer for a task,
  • Go to DoItCoach WatchKit App/Interface.storyboard
  • In the bottom right hand side Object Library search for a Group UI control.
  • Drag and drop the Group onto your main screen
  • In Attributes Inspector, choose Horizontal: Center, Vertical: Center, in Background select Time12 image, in Height select 0.9 to make sure the circle has no distortion.
  • In Object Library search for a Button UI control.
  • Drag and drop the Group onto your newly created group
  • In Attributes Inspector, select Content and assign the value Group.
  • In left hand side scene view, select the newly appeared Group below the Button, set its Height to Relative to Container
  • In Object Library search for a Image UI control.
  • In Attributes Inspector, select Image and assign the value Start. Choose Horizontal: Center, Vertical: Center.
  • In Object Library search for a Timer UI control.
  • Drag and drop the Timer onto your Button group. Oops! what is happening, you timer is out of screen. Remember, by default Group have a horizontal layout, go to the Group under your Button and change Layout to Vertical. You can now see your timer element. For your timer, choose Horizontal: Center, Vertical: Center, Hidden: true, Units: Second, Minute checked, Text Color: Green, Front: system, Ultra thin, 27.
Build and run.
Et voila!


Add outlets

To link UI controls to your Swift code, same technique as for iOS app: use outlet and actions.
  • Control drag Label to InterfaceController.swift, select outlet, name it taskNameLabel
  • Control drag Group (the top level one) to InterfaceController.swift, select outlet, name it group
  • Control drag Button to InterfaceController.swift, select outlet, name it startButton
  • Control drag Image underButton Group to InterfaceController.swift, select outlet, name it startButtonImage
  • Control drag Timer to InterfaceController.swift, select outlet, name it timer

Add Shared business model

To add Task business model to WatchKit App Extension, go to Build phases, in Compiled Sources, add Task.swift and TasksManager.swift.

In TasksManager.swift, replace the empty init() by the following one to bootstrap some values into your AppWatch:
public init() {
  self.tasks = [TaskActivity(name: "Task1", manager: self), TaskActivity(name: "Task", manager: self)]
}

App life cycle

In InterfaceController.swift, add display(task:) method as below:
func display(task: Task?) {
  guard let task = task else { // [1]
    taskNameLabel.setText("NOTHING TO DO :)")
    timer.setHidden(true)
    startButtonImage.setHidden(true)
    return
  }
  taskNameLabel.setText(task.name) // [2]
}
  • [1]: if there are no task available display in the task label: nothing to do and hide all other components
  • [2]: otherwise for a new task, display the task's name
In InterfaceController.swift, in awakeWithContext(context:) add a call to display method as below:
override func awakeWithContext(context: AnyObject?) {
  super.awakeWithContext(context)
  display(TasksManager.instance.currentTask)
}

Add action to Start

In InterfaceController.swift, in awakeWithContext(context:) add a call to display method as below:
@IBAction func onStartButton() {
  guard let currentTask = TasksManager.instance.currentTask else {return} // [1]
  if !currentTask.isStarted() { // [2]
    let duration = NSDate(timeIntervalSinceNow: currentTask.duration)
    timer.setDate(duration)
    timer.start() // [3]
    currentTask.start()
    startButtonImage.setHidden(true) // [4]
    timer.setHidden(false) // [5]
    taskNameLabel.setText(currentTask.name)
  }
}
  • [1]: if there are no task return
  • [2]: otherwise if the task is not already started
  • [3]: start it
  • [4]: hide start button
  • [5]: show timer

Get final project

If you want to check the final project, here are the instructions how to get it.
cd DoItCoach
git checkout step3
open DoItCoach.xcodeproj

What's next?

With this tutorial, you saw how you can layout your first AppleWatch screen, how you connect your UI element to the code to add dynamic effect on your screen. Now it is time to talk about animation: how do you make the ring show timer progress?

See Watch tutorial 4: Animation

Watch tutorial 2: Watch Architecture

This post is the second post of a set of short tutorials on Watch. If you want to see the previous post. In this tutorials, you're going to build your first AppleWatch app: DoItCoach.

Let's start by talking about what is an Watch app...

How does a watch app work?

First thing to know about AppleWatch app is that is always come bundles with its companion iOS app. It's the same idea as the App extensions introduced in iOS8, where you have a main iOS app and you can add extensions. Those extensions are embedded into Today, Shared (depending on their type) component. Like Extension, for AppleWatch app, you create an app project which comes with several build targets.

A Watch app consists of two separate bundles that work together.
  • WatchKit App: contains the storyboards and resource files needed to display your interface.
  • WatchKit Extension: contains the code needed for your native AppleWatch app. This is the part to get compiled and the binaries get transferred to your watch.

Side note: WatchOS vs watchOS2

As a side note, I think it's interesting to look back and know the differences between watchOS (the first version released in April 2015) and watchOS2 (released in September 2015). An image is worth a thousand worlds:


Now In watchOS 2, the extension runs on the user’s Apple Watch instead of on the user’s iPhone, as was the case in watchOS 1. This is the fundamental change for watchOS2: you can run watch native apps. The separation into Watch app / Watch Extension makes even more sense in the context of WatchOS1 as the binaries were deployed in different physical targets. In watchOS2, there is still the distinction of Watch app (storyboard, resources) and Watch extension (code binaries) although both are deployed natively to the AppleWatch.

The separation between WatchKit App and WatchKit Extension also means that the app's user interface is static and can't be changed at runtime. Adding or removing elements, for example, isn't possible. You can show and hide user interface elements though (I'll tell you more about that in Layout tutorial). This is done this way to save Watch resources so that it doesn't drain the battery.

Having the code binaries deployed natively makes your apps launch quicker, and be far more responsive as you remove the bluetooth latency. It also changes drastically the way you communicate/synchronize data between AppleWatch and its companion app. I tell you more about that in WatchConnectivity tutorial.

You now need to share a common business model between you iOS app and your Watch app. For that purpose, I like to separate the business model in a Shared group. This group is included in both iOS and Watch Extension target so it gets compiled and deployed on both.

Shared business model

Before you start coding,have a look at the shared business model. This model is used in the iOS app and will also be used in the Watch to represent a Task. Looking at the Task protocol:
public protocol Task: CustomStringConvertible {
  var name: String {get}
  var duration: NSTimeInterval {get}
  var startDate: NSDate? {get set}
  var endDate: NSDate? {get set}
  var timer: NSTimer? {get set}
  var type: TaskType {get set}
  func start()
  func stop()
...
}
We see a Task has a name, a duration, a startDate and endDate and two methods to start and stop the Task.

Ready for some code?
3, 2, 1... Go

Get starter project

In case you missed Watch tutorial 1: Which app?, here are the instructions how to get the starter project. Clone and get the initial project by running:
git clone https://github.com/corinnekrych/DoItCoach.git
cd DoItCoach
git checkout step1
open DoItCoach.xcodeproj

Create your Watch targets

To add an AppleWatch deployment target, in Xcode:
  • Go to File -> New -> Target...
  • Under watchOS, select Application tab and then choose WatchKit app
  • In product name enter DoItCoach WatchKit App
  • Untick all include scene, hit Finish button
  • Click yes when Xcode prompts you to activate Apple Watch schema
If prompted: Activate “DoItCoach WatchKit App” scheme?, answer yes.


You should now be able to see your the new target: DoItcoach Watch App, Xcode should have created its matching schema:


You've just created your first Watch app, but if you run the appleWatch screen is all black :(

Let's add a label

In Xcode:
  • Go to newly created Group named DoItCoach Watch App
  • Select Interface.storyboard, in the bottom right hand side Object Library search for a Label UI control.
  • Drag and drop the label onto your main screen
  • In Attributes Inspector:
    • in Alignment section, select Horizontal: center
    • change Text Color to Blue
    • in Font select System, UltraLight 17

Build and Run


To run in the simulator

Select DoItCoach WatchKit App schema with iPhone6sPlus + AppleWatch - 42 mm as targeted simulators.
The command should start both simulators and launch the iOS app and the AppleWatch app. In Xcode, in the left hand side Debug Navigator, you can see debug information for each app.


Note: Sometimes, Xcode failed to attache the debug process of the iOS app, you can do it manually:
  • either by selecting the schema that is not launched and run it again.
  • or by manually attaching the iOS app debug process to Xcode. It quite simple and I think this blog post explained it well

To run on Watch

When you want to run your app on Watch, plug your phone to a USB port, and keep you watch close by. You can install the app on your phone:
  • either by selecting DoItCoach WatchKit App schema with your iPhone and Paired Watch. This way, you can install the app in debug mode.
  • or by selecting by selecting DoItCoach schema with your iPhone selected. Open Watch app, in General -> App Install section, make sure Automatic App Install is checked. Once the app is installed on your iPhone, its Watch app will be automatically installed on your Watch. With this approach you won't be able to debug your Watch app but the install might be quicker.


  • Get final project

    If you want to check the final project, here are the instructions how to get it.
    cd DoItCoach
    git checkout step2
    open DoItCoach.xcodeproj


    What's next?

    With this first introduction tutorial, you saw how the Watch app is architectured:

    To sum up, an AppleWatch project is typically build three main parts: iOS app (iOS storyboard, iOS code), Watch app (watch storyboard), Watch extension (Watch code).

    You also created you first AppleWatch target, see how to build and run the apps on simulators or iPhone/paired Watch. You are now ready to add more UI controls on your watch screen. See Watch tutorial 3: Layout.

    Watch tutorial 1: Which app?

    This post is the first post of a set of short tutorials on Watch. In these step by step tutorials, you're going to build your first AppleWatch app. Yay!

    I'll guide you through. No prior knowledge on watchOS2 is required, but some basic iOS development skills (storyboards usage) and Swift language knowledge are assumed.

    When designing for an AppleWatch, you should keep the features simple. Bear in mind they'll have to work at on a 312 pixels wide by 390 pixels tall screen for a 42 mn watch. Don't try to fit too many features with a complexe screen hierarchy. Also, remember that your watch app comes with its iPhone companion app. Therefore, you don't need to fit all the features in the watch extension: a well chosen subset will do well.

    Let's start by talking about the app, you're going to build...

    DoIt Coach


    Have you ever wonder how to get more things done during the day, how to stay focus on your tasks? After all, getting your job done efficiently gives you more free time ;)

    Based on a well known time management technique, with DoItCoach, you break your day in small tasks interlaced with small breaks. DoItCoach's main goal is to be more efficient and stay healthy.

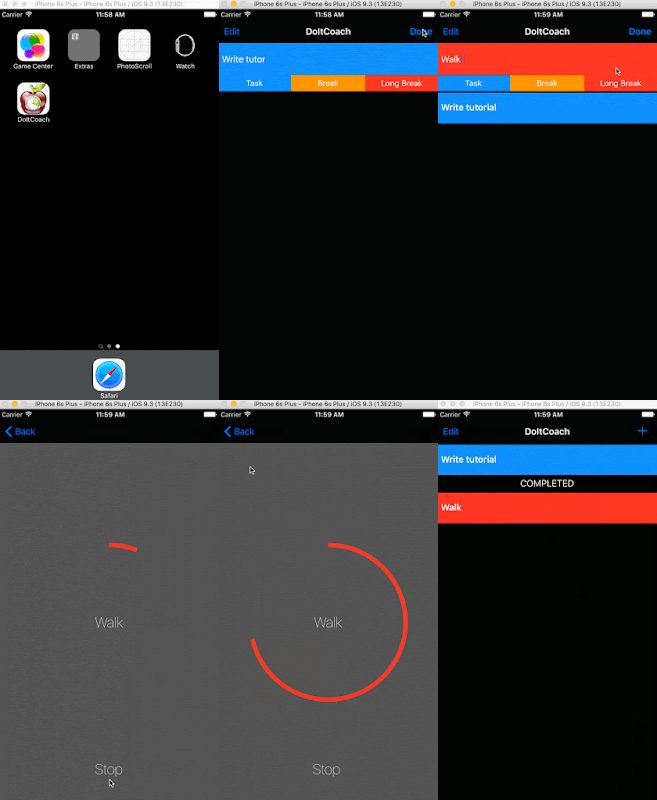
    Start the day, planning the list of task to be done. For the planification use the iPhone app. Add one task followed by one break. After a 3 of those add a longer break.

    Let's spice it up: since you want to stay fit in your life, you're going to try to do something physical during your breaks. Shorter breaks could be perfect for some weight lifting or curls ;) while longer breaks could be used for outdoor walk or short run.

    The iOS app

    Since the goal of this tutorial is about Watch app, you'll start with an initial project. All source code is available on github DoItCoach project for the final project.

    Starter project

    Clone and get the initial project by running those git commands:
    git clone https://github.com/corinnekrych/DoItCoach.git
    git checkout step1
    open DoItCoach.xcodeproj
    

    Build and Run

    open DoItCoach.xcodeproj
    
    Run the project in Xcode.

    You can add new task, move them and start the first task in the list. Once completed, the task is moved at the bottom of the list and a new one is available for you to start.

    What's next?

    With this first introduction tutorial, you saw how the iOS app DoItCoach worked. It's now your turn to work: let's add the AppleWatch target. See Watch tutorial 2: Watch Architecture